Breadcrumbs
Teaching From Home: Best Practices and Etiquette for Zoom Teachers and Panelists
Teaching via Zoom from home or other private environment offers some unique challenges. Most of the teaching sessions are done using the webinar format (as opposed to meeting format), so you will not have the luxury of seeing the students you are teaching to; therefore, being familiar with the communications tools that you do have is very important. When you are live, but also when you are preparing to go live, after your lecture, and when you are co-teaching and others have the floor, being able to quickly note the status of what students are seeing and hearing from you is key. Here are some tips for keeping track and adjusting camera, microphone, and chat settings.
You must let MedIT know if you are teaching from home.
Please use the Lecturer Form to let us know if you are teaching from home or other offsite location: we need to ensure that the session is properly staffed for support. If you have already submitted the Lecturer Form and wish to revise your teaching location (i.e., you want to teach on campus instead, please send an email to medlectures@utoronto.ca and include:
- course name
- lecture date
- lecture time
- campus: St. George (MSB) or UTM (MAM)
Become familiar with the Zoom camera and microphone controls
The camera and microphone mute/unmute buttons may appear in several places on the screen depending on your configuration and you should know quickly how to mute and unmute your camera and microphone. The most consistently-available one is on the left at the bottom of the window (top on a tablet). It may be invisible until you hover your mouse over the bottom of the window (or tap the screen of the tablet).

When the Stop Video button has no red line through it, your camera is on. To turn your camera off, click the Stop Video button.

When the Start Video button has a red line through it, your camera is off. To turn your camera on, click the Start Video button
You can also memorize these keyboard shortcuts for muting and unmuting your mics and camera:
Windows:
- Toggle video On/Off: Alt+V
- Toggle audio On/Off: Alt+A
Mac:
- Toggle audio On/Off: Cmd+Shift+A
- Toggle video On/Off: Cmd+Shift+V
When you enter the webinar via the panelist link provided, your camera and microphone should be off.
Here’s how to do this for all your Zoom calls:
- Open your Zoom app on your desktop
- Click on Settings
- On the Audio tab, click the checkbox 'Always mute the microphone when joining a meeting' at the bottom of the screen
- On the Video tab, click the checkbox ' Always turn off video when joining meeting' at the bottom of the page under the Meetings heading
You may be entering a webinar already in session
- You may be entering a webinar already in session with another lecturer presenting to the group. It is common for MD Program and conference sessions to run for several hours, and you may be presenting in the middle of a longer session. When you enter the webinar, having your camera and microphone off will ensure that you do not disrupt a presentation already in session
- if someone is already presenting, you will see this after you enter the webinar, and you will see when they are finished. During this time, rename yourself if necessary
- if you are the first person presenting in the webinar, the technician supporting the session will let you know this; rename yourself and turn your camera and microphone on
Consider yourself live at all times
After you unmute your camera and microphone, be aware that the audience will be able to see and hear you at all times
During breaks, the webinar remains live: there is no way to “pause” it. Because you cannot see the audience, you may forget that they are there during breaks. If you need to eat, make or take a phone call, or conduct other personal business during a break, turn off your microphone and camera
- Especially during breaks in a presentation with several panelists, this may seem like a good time to connect with your fellow faculty or professionals; however, do remember that these conversations will not be private among the panelists and all student audience members will also hear them.
Using the Chat
In the Zoom chat, you can choose who the recipient of your message will be:
- one individual
- all panelists
-
all attendees and panelists
Choose the correct recipient(s) before sending your message. The chat can be handy for messaging the host or other panelists about housekkeping matters that are not for the general audience to be party to.
If you receive a message when you do not have the chat window open, you will receive a notification at the bottom of your screen.
Changing Your Name
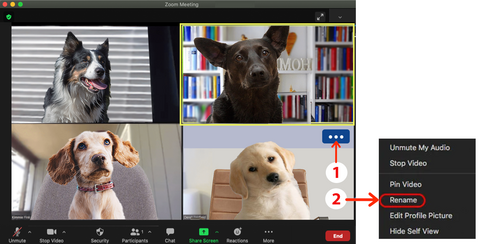
You may have signed in with someone else's account link and need to change the name that appears to everyone in the session. The easiest way to do this is as follows:
- Click on the triple elipses at the top right of your image frame
- In the box that opens, click Rename and replace the name.

Your new name will appear to everyone in the meeting or webinar:
- when your camera is on: at the bottom left of your video frame
- when your camera is off: in place of your camera image